CSRF Defence - Synchronizer Token Pattern Demo
I have wrote some theoretical background of CSRF and CSRF prevention mechanisms in previous posts. If you don't have much idea about what CSRF and how prevention mechanisms works, please go back and read them first. These are the links for them.
From here onword, I assume you have the basic idea of concept of CSRF attack and prevention mechanisms. So, lets get started.
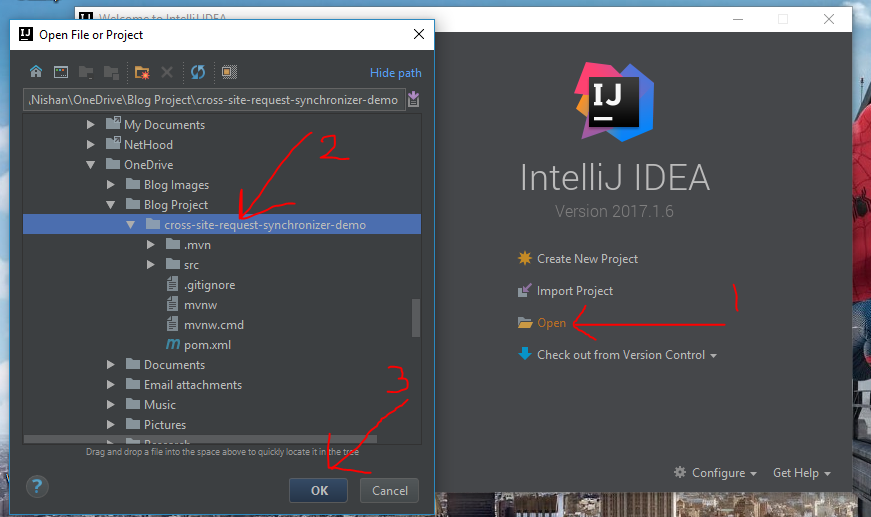
This post is fully practical based one. At them end of this, There will be fully functioning web based application to demonstrate how CSRF attack works and how to prevent it using synchronizer token pattern. So, in order to follow this, you will need to setup your development environment first. These are the technologies I used to develop this demonstration application.
Technologies
- Java 8
- Spring Boot Framework
- Spring Security
- Maven
- Bootstrap 4 (Optional, Just for enhance the look and feel)
- IntelliJ IDEA 2017 (or You can use your favorite Java IDE)
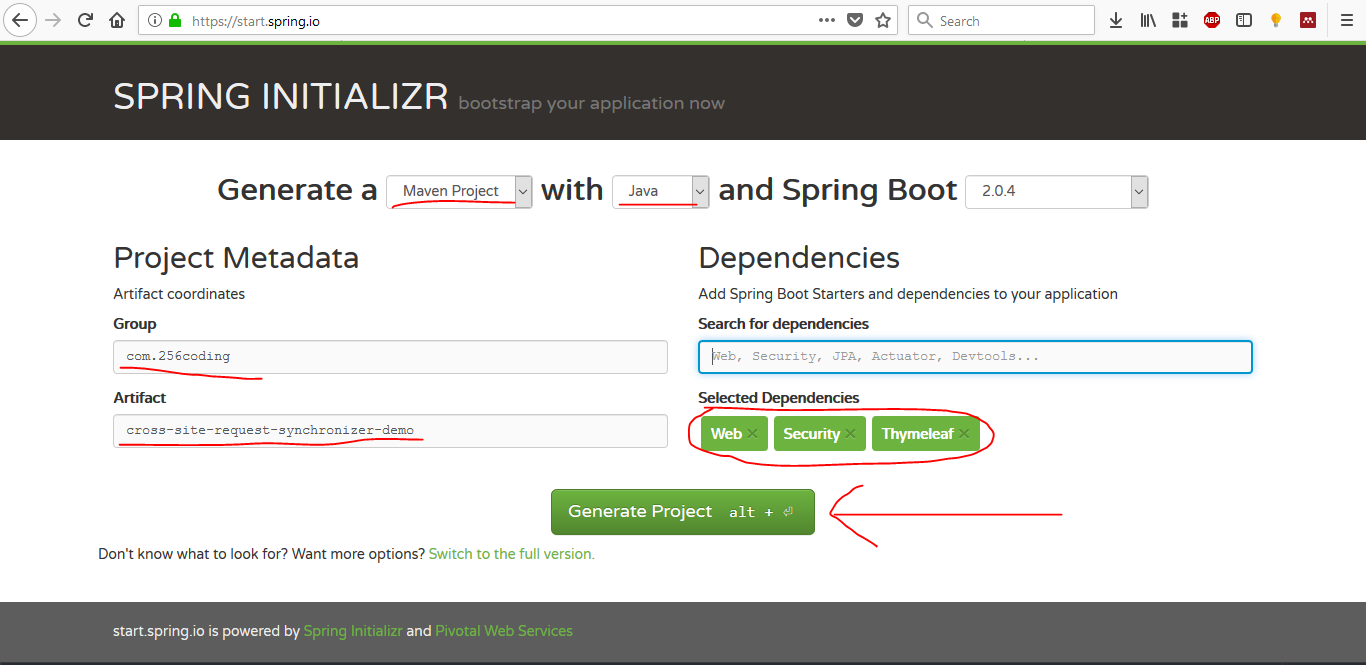
- Spring Web (To setup web based configuration and embedded tomcat server.)
- Spring Security (To setup authentication (login function) for the user)
- Thymeleaf (Template engine to easily serve different web pages to client)
package com.n256coding.crosssiterequestsynchronizerdemo.configurations;
import org.springframework.beans.factory.annotation.Autowired;import org.springframework.context.annotation.Bean;import org.springframework.context.annotation.Configuration;import org.springframework.security.config.annotation.authentication.builders.AuthenticationManagerBuilder;import org.springframework.security.config.annotation.web.builders.HttpSecurity;import org.springframework.security.config.annotation.web.configuration.EnableWebSecurity;import org.springframework.security.config.annotation.web.configuration.WebSecurityConfigurerAdapter;import org.springframework.security.crypto.bcrypt.BCryptPasswordEncoder;
@Configuration@EnableWebSecuritypublic class WebSecurityConfig extends WebSecurityConfigurerAdapter {

    @Autowired    AuthenticationSuccessHandler successHandler;
    @Override    protected void configure(HttpSecurity http) throws Exception {
        http.authorizeRequests()
                .antMatchers("/home", "/")
                    .authenticated()
                .and()
                .formLogin()
                    .loginPage("/login")
                    .successHandler(successHandler)
                .permitAll();
        //I have manually implemented this function        http.csrf().disable();    }

    @Override    protected void configure(AuthenticationManagerBuilder auth) throws Exception {
        BCryptPasswordEncoder passwordEncoder = passwordEncoder();        auth.inMemoryAuthentication().withUser("user").password(passwordEncoder.encode("pwd")).roles("USER");    }


    @Bean    public BCryptPasswordEncoder passwordEncoder() {
        return new BCryptPasswordEncoder();             //Encode the password so that it will not readable meaningfully    }
}
This is the class where all client requests comes first. We have to write logic to handle how that requests flow through. As this is a demo application, I have used pre-defined username and password for login. For that, I have used Spring security in-memory authentication. password encoder will encode password for enhanced security. In spring security, there is in built CSRF privention mechanism. But as we implement it manually, I have disabled it.
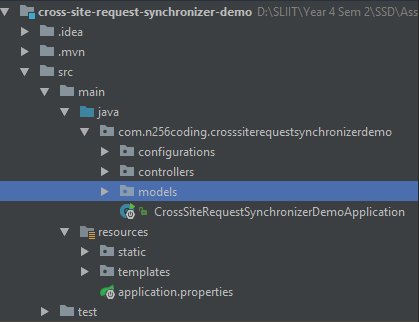
In the above class, there is another class called AuthenticationSuccessHandler. You can see, we have passed an object of that class into .successHandler() method. So, it will call successHandler in every successfull login. As you can remember, we have to create a Session ID and CSRF Token for each succesfull login. That operation is happening in AuthenticationSuccessHandler class. So lets implement it. Create AuthenticationSuccessHandler class in configurations package and add this code in it.
package com.n256coding.crosssiterequestsynchronizerdemo.configurations;
import com.n256coding.crosssiterequestsynchronizerdemo.models.SessionStore;import org.springframework.security.core.Authentication;import org.springframework.security.web.authentication.SimpleUrlAuthenticationSuccessHandler;import org.springframework.stereotype.Component;import org.springframework.web.context.request.RequestContextHolder;
import javax.servlet.ServletException;import javax.servlet.http.HttpServletRequest;import javax.servlet.http.HttpServletResponse;import java.io.IOException;
@Componentpublic class AuthenticationSuccessHandler extends SimpleUrlAuthenticationSuccessHandler {

    @Override    public void onAuthenticationSuccess(HttpServletRequest request, HttpServletResponse response, Authentication authentication) throws IOException, ServletException {
        super.onAuthenticationSuccess(request, response, authentication);        SessionStore.getInstance().newSession(RequestContextHolder.currentRequestAttributes().getSessionId());    }
}
You can see that there is another class called SessionStore in this class. As you can remember, I have told in previous post, we need to keep Session ID and CSRF Token in server. SessionStore is responsible to maintain list of Session IDs and CSRF Token for each Session ID in server. So lets implement SessionStore class.
Create a class called SessionStore in models package. Add this code into the class.
package com.n256coding.crosssiterequestsynchronizerdemo.models;

import java.util.HashMap;import java.util.UUID;
public class SessionStore {
    private static SessionStore ourInstance = new SessionStore();    private HashMap<String, String> sessionIds = new HashMap<>();
    public static SessionStore getInstance() {
        return ourInstance;    }

    private SessionStore() {
    }

    public String getCsrfOf(String sessionId) {
        return sessionIds.get(sessionId);    }

    public void newSession(String sessionId){
        String csrf = UUID.randomUUID().toString();        this.sessionIds.put(sessionId, csrf);    }

    public HashMap<String, String> getHashMap(){
        return sessionIds;    }
}
This class is implemented on singleton design pattern. There is only one instance of singleton class will available in an application. So we can easily use this class to transfer or keep storing data within different objects. In the newSession() method, I create the CSRF Token and put Session ID and Generated CSRF Token in a Java HashMap.
Next step is developing controllers. These are the classes that handles to REST endpoints. In this program, I have added two controllers. One is for handling REST API endpoints and other class for handling page requests. First lets create class called MainController in controllers package and add following code segment into that.
package com.n256coding.crosssiterequestsynchronizerdemo.controllers;
import org.springframework.stereotype.Controller;import org.springframework.web.bind.annotation.GetMapping;
import java.security.Principal;
@Controllerpublic class MainController {

    @GetMapping("/login")
    public String getLoginPage(Principal user) {
        if (user != null) {
            return "redirect: ";        }
        return "login";    }

    @GetMapping({"/home", "/"})
    public String getHomePage() {
        return "home";    }
}
This controller class is responsible to serve html pages to client. As you can see, if client request locahost:8080/login , this will return login page. You can see that we are returning just a string ("login"). But actually it is returning a html page named "login.html". That magic happening with Thymeleaf template engine (You can remember dependencies we added before). Then you will get another question. Where is this login.html located? It is located in resources/templates folder.

You should add "login.html" to above folder (templates). Then thymeleaf template engine will automatically serve it. Lets create "login.html" in templates folder and add following html code into that.
<!doctype html><html><head>    <!-- Required meta tags -->    <meta charset="utf-8">    <meta name="viewport" content="width=device-width, initial-scale=1, shrink-to-fit=no">
    <!--Bootstrap CSS-->    <link rel="stylesheet" href="https://stackpath.bootstrapcdn.com/bootstrap/4.1.0/css/bootstrap.min.css"          integrity="sha384-9gVQ4dYFwwWSjIDZnLEWnxCjeSWFphJiwGPXr1jddIhOegiu1FwO5qRGvFXOdJZ4" crossorigin="anonymous">    <title>Cross Site Reference Demo</title>
</head><body><div class="container">    <div class="jumbotron">        <h1 class="display-4">Log-in to getting started</h1>        <p class="lead">You should log into the system to view response</p>    </div>    <form action="/login" method="post">        <div class="form-group">            <label for="exampleInputEmail1">Username</label>            <input type="text" class="form-control" id="exampleInputEmail1" aria-describedby="emailHelp"                   placeholder="Enter username" name="username">        </div>        <div class="form-group">            <label for="exampleInputPassword1">Password</label>            <input type="password" name="password" class="form-control" id="exampleInputPassword1" placeholder="Password">        </div>        <input type="hidden" id="csrf_token">        <button type="submit" class="btn btn-primary">Log in</button>    </form></div></body></html>
Next step is to create "home.html". This home.html is the page where money transaction happening. So this is the page where contain vulnerable request generated. Lets create that page. create "home.html" in resources/templates folder (As mentioned earlier). Then add following html code into that file.
<!DOCTYPE html><html lang="en"><head> <meta charset="utf-8"> <meta name="viewport" content="width=device-width, initial-scale=1, shrink-to-fit=no"> <!--Bootstrap CSS--> <link rel="stylesheet" href="https://stackpath.bootstrapcdn.com/bootstrap/4.1.0/css/bootstrap.min.css" integrity="sha384-9gVQ4dYFwwWSjIDZnLEWnxCjeSWFphJiwGPXr1jddIhOegiu1FwO5qRGvFXOdJZ4" crossorigin="anonymous"> <title>Money Transactions</title></head><body><div class="container"> <div class="jumbotron"> <h1 class="display-4">Welcome to Soora Pappa Bank</h1> <p class="lead">You have successfully logged into money transferring section</p> </div> <form id="my_data_form" method="post"> <div class="form-group"> <label for="receiver_account_number">Enter receiver's account number?</label> <input type="text" name="receiver_account_number" class="form-control" id="receiver_account_number" placeholder="546165498465165"> </div> <div class="form-group"> <label for="value">How much you want to transfer?</label> <input type="text" name="value" class="form-control" id="value" placeholder="1000"> </div> <button type="submit" class="btn btn-primary">Transfer</button> </form></div> <div id="informationModel" class="modal fade" tabindex="-1" role="dialog"> <div class="modal-dialog" role="document"> <div class="modal-content"> <div class="modal-header"> <h5 class="modal-title">Information</h5> <button type="button" class="close" data-dismiss="modal" aria-label="Close"> <span aria-hidden="true">×</span> </button> </div> <div class="modal-body"> <p id="form_response"></p> </div> <div class="modal-footer"> <button type="button" class="btn btn-primary" data-dismiss="modal">Close</button> </div> </div> </div></div> <script src="https://ajax.googleapis.com/ajax/libs/jquery/3.3.1/jquery.min.js"></script><!--<script src="https://code.jquery.com/jquery-3.3.1.slim.min.js" integrity="sha384-q8i/X+965DzO0rT7abK41JStQIAqVgRVzpbzo5smXKp4YfRvH+8abtTE1Pi6jizo" crossorigin="anonymous"></script>--><script src="https://cdnjs.cloudflare.com/ajax/libs/popper.js/1.14.3/umd/popper.min.js" integrity="sha384-ZMP7rVo3mIykV+2+9J3UJ46jBk0WLaUAdn689aCwoqbBJiSnjAK/l8WvCWPIPm49" crossorigin="anonymous"></script><script src="https://stackpath.bootstrapcdn.com/bootstrap/4.1.3/js/bootstrap.min.js" integrity="sha384-ChfqqxuZUCnJSK3+MXmPNIyE6ZbWh2IMqE241rYiqJxyMiZ6OW/JmZQ5stwEULTy" crossorigin="anonymous"></script><script src="/scripts.js"></script></body></html>
You can see that we have refereed to a JavaScript file called "scripts.js". This is the script where the AJAX request happening.
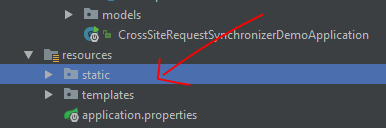
All static resources what referring to html pages should be added to scrips folder. So lets create "scripts.js" in resource/static folder and add following JavaScript code into that file.
$.post('/csrf', {}, function (data, status) {
    const csrf_token = data;    $('<input>').attr({
        type: 'hidden',        id: 'X-CSRFToken',        name: 'csrf_token',        value: data.csrf
    }).appendTo('form');});
$('#my_data_form').submit(function (event) {
    event.preventDefault();    var formData = {};    formData.receiver_account_number = $('#receiver_account_number').val();    formData.value = $('#value').val();    formData.csrf_token = $('#X-CSRFToken').val();

    $.ajax({
        type : "POST",        url : "/mydata",        data : $(this).serialize(),        success : function (data, status) {
            if(status == "success") {
                if (data.response == "success") {
                    $("#form_response").html('Data transfer is successful');                }
                else if (data.response == "forbidden") {
                    $("#form_response").html('Request forbidden. Transferring process cancelled.');                }
            }
            else{
                $("#form_response").html('Unknown error occurred. Try again');            }
            $('#informationModel').modal('show');        }
    });
});
The first function of this script is to request CSRF Token in each time page loads. Second fumction is to send money transferring request.
This script is calling two endpoints "/csrf", "/mydata" in server to request CSRF Token and make money transfer request respectively. But currently in our server, we haven't implemented that end points. So, we need to create another controller in our server. Lets create a class called "RequestController" in controllers package and add following code into that.
package com.n256coding.crosssiterequestsynchronizerdemo.controllers;
import com.n256coding.crosssiterequestsynchronizerdemo.models.DataStore;
import com.n256coding.crosssiterequestsynchronizerdemo.models.MyData;
import com.n256coding.crosssiterequestsynchronizerdemo.models.SessionStore;
import org.apache.catalina.servlet4preview.http.HttpServletRequest;
import org.springframework.web.bind.annotation.CookieValue;
import org.springframework.web.bind.annotation.GetMapping;
import org.springframework.web.bind.annotation.PostMapping;
import org.springframework.web.bind.annotation.RestController;
import javax.servlet.http.HttpServletResponse;
import java.util.Collections;
import java.util.HashSet;
import java.util.Map;
 @RestControllerpublic class RequestController {
    private SessionStore sessionStore = SessionStore.getInstance();
private DataStore dataStore = DataStore.getInstance();
    @PostMapping("/csrf")
    public Map<String, String> getCsrfOf(@CookieValue("JSESSIONID") String sessionId) {
        return Collections.singletonMap("csrf", sessionStore.getCsrfOf(sessionId));    }

    @PostMapping(value = "/mydata")
    public Map<String, String> setInformation(@CookieValue("JSESSIONID") String sessionId,                                              HttpServletRequest request,                                              HttpServletResponse response) {
        String csrfToken = request.getParameter("csrf_token");        String accountNumber = request.getParameter("receiver_account_number");        double value = Double.parseDouble(request.getParameter("value"));
        if(csrfToken == null || !sessionStore.getCsrfOf(sessionId).equals(csrfToken)){
            response.setStatus(403);            return Collections.singletonMap("response", "forbidden");        }
        else if(sessionStore.getCsrfOf(sessionId).equals(csrfToken)){
            response.setStatus(200);            return Collections.singletonMap("response", "success");        }
        else{
            return Collections.singletonMap("response", "forbidden");        }
    }

    @GetMapping(value = "/transactions")
    public HashSet<MyData> getAllRequests(){
        return dataStore.getRequests();    }
}
Now we have successfully created to this application. Its time run build and run it. Using the command prompt (or terminal in Mac/Linux) navigate into the project folder and run following command. In order to build this project, Apache Maven should be download and installed into your computer first. If you are not sure that maven is installed or not, run "mvn -v" command in command prompt. If it shows the version number, maven is configured in your system. If not, please refer this.
You can find completed project in my Github repo.
If you are ready with Maven, run following command to build application.
mvn clean package
If build is successful, you can see the success message in console.

java -jar cross-site-request-synchronizer-demo-0.0.1-SNAPSHOT.jar
Then the application should start and show following message in console.

Now go to your web browser and enter following URL.
locahost:8080
Then it should show this login page

Username - User
Password - pwd
After entering login credentials, you should be able to view home.html.

Lets see how this request going through. To see that open developer tools in your browser (press F12 key). Then go to network tab in developer tools and put tick on Persist logs.

Then do another transfer again while open developer tools. Then you will see a request is happening.
This http://localhost:8080/mydata is the request we make to do the transaction. Go to Params tab in here.

Lets try to send this request without csrf_token. For that you can create another html file named "attacker.html" and paste following html code. You can create this file in anywhere (no needs to be in project folder).
<!DOCTYPE html><html lang="en"><head>    <meta charset="utf-8">    <meta name="viewport" content="width=device-width, initial-scale=1, shrink-to-fit=no">
    <!--Bootstrap CSS-->    <link rel="stylesheet" href="https://stackpath.bootstrapcdn.com/bootstrap/4.1.0/css/bootstrap.min.css"          integrity="sha384-9gVQ4dYFwwWSjIDZnLEWnxCjeSWFphJiwGPXr1jddIhOegiu1FwO5qRGvFXOdJZ4" crossorigin="anonymous">    <title>Attacker</title></head><body><div class="container">    <img src="https://vignette.wikia.nocookie.net/boombeach/images/3/3b/Congratulation.gif/revision/latest?cb=20150501215824">    <div class="alert alert-danger" role="alert">        <h1 class="display-4">Congratulations!</h1>        <p class="lead">You are the 10000th viewer of this web site. We are happy to say that you have received a prize. We need to make sure you are not a robot. You can confirm this by clicking the button below.</p>        <hr>        <p class="mb-0">Click this button to ensure that you are not a robot and claim prize.</p>        <form id="my_data_form" method="post" action="http://localhost:8080/mydata">                <input type="hidden" name="receiver_account_number" class="form-control" id="receiver_account_number" value="hacker">                <input type="hidden" name="value" class="form-control" id="value" value="1000">            <button type="submit" class="btn btn-success btn-lg">Claim Gift!!</button>        </form>    </div></div></body></html>
Then double click and open this "attacker.html" file. You will see this interface.

Before clicking Claim Gift button, open developer tools and go to network tab. So you can see what is the request going thought. So lets try to click on Claim Gift button.

This is the end of this tutorial. This post grown larger than I expected. But I think more details mean less confusions. If you got some difficulties while development, feel free to check my project in github and you are free to change, share, play with it. Anyway, if you have any questions, suggestions, modifications regarding this tutorial, you can always contact me on comment section. I'm always happy to answer.
Github Project - https://github.com/n256Coding/cross-site-request-synchronizer-demo
Thank You
Nishan Sajeewee


Comments
Post a Comment