Lets read emails in gmail using oAuth 2.0 (Application demo)
Today I will create a oAuth application using java programming language. The application will access google's gmail api and read emails in user's gmail inbox. To access user's gmail account, application will use oAuth access token obtained by gmail authentication server. Don't worry. I will demonstrate each step by clearly. So lets start computing from basics!
To use gmail api, we need to obtain app id and app secret from google api console. To do so, you will need a google account. If you are using a gmail account or any other google product (Ex. google drive, youtube), then you already have a google account. If you don't have a google account, you can create it from here. So then you will need to access into the google cloud api console. It has very clear and clean user interface. Google api console will provide various kinds of apis from each of google products. Since we are going to develop for Gmail, lets log into gmail api section. In google itself there are greate tutorials on using these apis.
As the first step, you need to log into google api dashboard. You needs to log into your google account in order to log into the google api dashboard.

You need to create a new project in cloud console. For that, click on "select a project" button.

Then click on "NEW PROJECT" button.

Here enter a name for the project you going to create and click "CREATE" button. The it will create a new project for you. It wil take few seconds. After creating the project you can go into the project homepage.
Now click on "ENABLE APIS AND SERVICES" button and search for gmail api.

Then select "Gmail API" card in search result. It will open Gmail api main page.

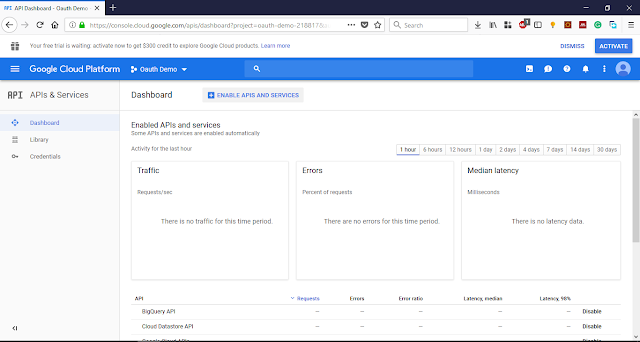
Click on "ENABLE" button to enable Gmail API within our project. Next you will redirected to Gmail API overview page.

As I mentioned earlier, we need api credentials in order to use Gmail API. So to create credentials, click "CREATE CREDENTIALS" button.

Fill above details as it is and click "What credentials do I need?" button.

Here you can give any name for your credential. As the redirect URL, fill the same URL as I filled. I will explain what is the usage of this redirect URL in the next section. For now, it is a REST endpoint within our web application. We don't need Javascript origins. So leave them blank. Then click "Create OAuth client ID" button.

Now you need to configure User Consent screen. user consent screen is the prompt that request user's confirmation to access to account using oauth. You may remember that in social network logins, they will ask access for some contents in your account. That is consent screen.
You can enter any name here. It will shown on the user concent screen. Then click "Continue" button.

Now you succesfully created your credentials. You can see your client id here. And also you can download your client_id and client_secret as a JSON file. Then click on "Done" button. Then go into credentials page. You would be able to see the credentials that you created now.

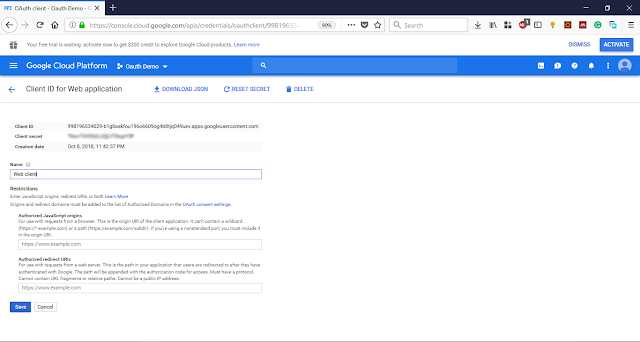
Now click on the credential we created now. In my case, "Web client". Then you will be able to see both client_id and client_secret.
We have succesfully obtained our client_id and client_secret!. Now its time to implement our web application and use these credentials.
We will going to develop this web application using Java, Spring Boot and Thymeleaf template engine. As the first step, we need to create a spring boot project. So lets create new project using spring initilizer.
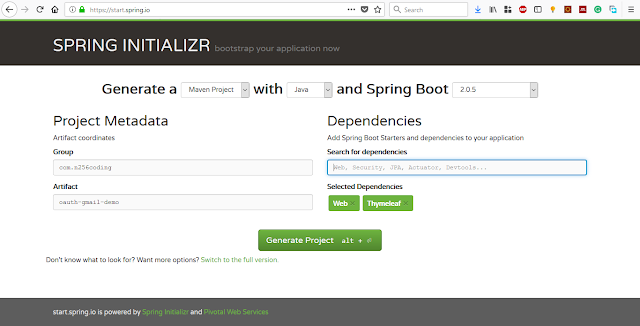
You can give and name for group and artifact. And also you can use latest version at the time you read this. Keep others as it is. Make sure to add "Web" and "Thymeleaf" dependencies. Then click "Generate Project" button. It will download a zip file. Extract that file and open that project using an IDE. It will use IntelliJ IDEA.
We need more 2 external libraries to be added into project. Since our project is a maven project, we can add dependencies to our pom file. Open the pom.xml using IDE and add these two dependencies into dependencies section.
It is better to make our application in a secure manner. So we can enable HTTPS support. So we can secure the connection between client and server. It is easy in spring boot. We need to create a secure self-signed certificate with .p12 format. We can create it using Java's keytool utility. Issue following command in command prompt (or terminal).
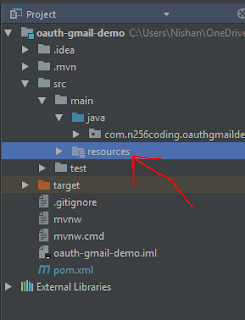
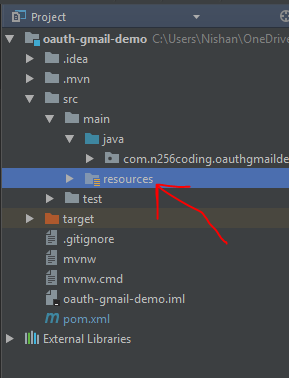
It will create a file called keystore.p12. We need to copy and paste that file into resources folder in our project.
Then we need to change some configurations in the application.properties file. So open that file and add following properties into the file.
server.ssl.key-store-password is the password you entered while creating keyfile. We will use port 8443 as in convension since we are using HTTPS.
Now we are succesfully configured HTTPS in our server!. Lets start coding!
As the first step, we can create the controller class. So lets create a package called "controllers" and create a class called "MainController" within that package. Then add this code into the class.
This method will run when Gmail server call redirection URL. So this is the redirection endpoint of our application.
To make Gmail related functions, I have created another class called "WebRequestHelper". So lets create a package called "helpers" and create "WebRequestHelper" class within that package. Then add following code into that class.
"requestOAuthToken" method is used to get access_code from google servers. It will call google authentication server with code we taken from redirection endpoint. Since we are using authorization_code grant type, we need to recall authentication server to obtain oauth access_token. That process will happen here.
"requestMailIds" method is used to get list of ids that relavent to each email message. So that we can read each email by the id of that mail. Here we will calling Gmail API with access_code we obtained in previous method. In the request, we will send access_code in header as Bearer token.
"getMailMessages" method is used to read messages by ids. We have obtained list of ids in previous method. In this method, we will use those ids to read content of messages. As the previous method, we will send the same oauth access_token as a Bearer token.
"extractMessageFrom" method is used to create a POJO using a given json object.
App credentials are stored in different place. That is a best practice since keeping credentials in a different place will make code more clear and takes modifiability to higher level.
So create an Interface called Enviorements and add following code into that.
Here you should replace your client_id and client_secret with above dummy values.
Now we need to create the Message class which acts like as a Data Model. So lets create a package called "models" and create a class called "Message" within that package. Then add following code into the class.
Now we have successfully created the back-end of this application. Now its time to create front-end.
Lets create a HTML page called "index.html" in resources/templates folder. Then add following code into that file.
This is the main page of this application. It contains a button which will call google authorization server to request user consent page. That process is done using a JavaScript. So I have created a JavaScript file called "scripts.js" to implement those functions.
So lets create a JavaScript file called "scripts.js" in resource/static folder. Then add following JavaScript code into that file.
Here I have imported JQuery in the top of script page. In the "request" function, You should replace your client_id with this dummy value.
Then we need to implement the web page to view emails. So lets create a HTML document called "works.html" in resources/templates folder and add following HTML code into the file.
This is the web page to show email messages. Here I have used Thymeleaf template engine to load data into page. You can see there is loop like thing named "th:each". It will iterate each of email message and append seperate div sections for each mail message.
Finally, we have made the application succesfully!. Its time to run and test it. Lets start our spring boot application.
First we need to build the application using maven. So issue following command.
mvn clean package
Then run the application
java -jar target\oauth-gmail-demo\target\oauth-gmail-demo-0.0.1-SNAPSHOT.jar
Now server will start in port 8443
Open a web browser and enter this url
https://localhost:8443
Since we are using a self-signed certificate, browser will show a warning. You can allow the exception and make our application trusted. Then we can be able to see the main page of our application. Click on "View my Gmail messages" button. It will redirect you to google login page. If you have already logged into google account, you will see the user consent page. You can allow it. Then you can be able to see your latest 20 emails within your application page.
If the your application works as above mentioned way, all done. If it is not working as above, don't worry. It can be a small mistake. You can refer my fully working github project. And also you can ask me in comment section.
This is the end of this post. I hope this tutorial will help you to make a greate step into OAuth and Gmail API. Anyway, thank you for reading this.
Github Project - https://github.com/n256Coding/oauth-gmail-demo
To use gmail api, we need to obtain app id and app secret from google api console. To do so, you will need a google account. If you are using a gmail account or any other google product (Ex. google drive, youtube), then you already have a google account. If you don't have a google account, you can create it from here. So then you will need to access into the google cloud api console. It has very clear and clean user interface. Google api console will provide various kinds of apis from each of google products. Since we are going to develop for Gmail, lets log into gmail api section. In google itself there are greate tutorials on using these apis.
As the first step, you need to log into google api dashboard. You needs to log into your google account in order to log into the google api dashboard.

You need to create a new project in cloud console. For that, click on "select a project" button.

Then click on "NEW PROJECT" button.

Here enter a name for the project you going to create and click "CREATE" button. The it will create a new project for you. It wil take few seconds. After creating the project you can go into the project homepage.
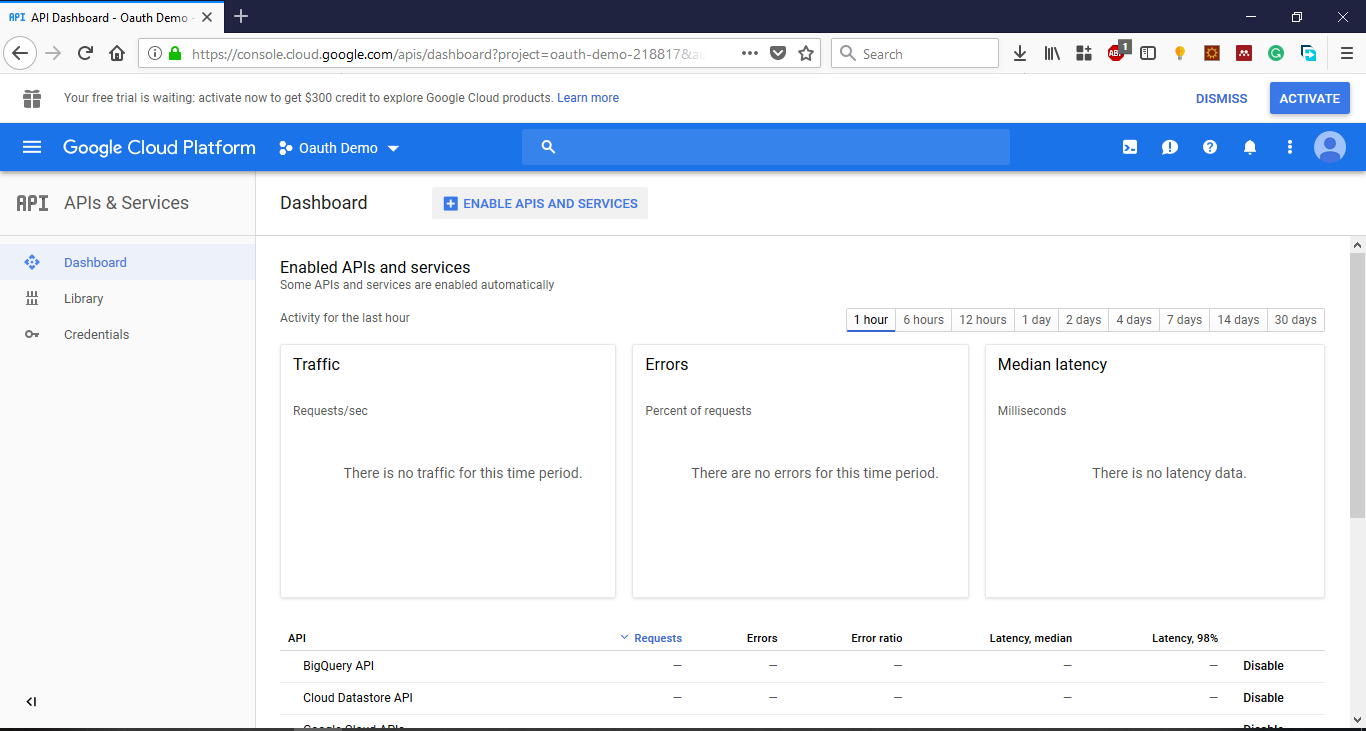
Now click on "ENABLE APIS AND SERVICES" button and search for gmail api.

Then select "Gmail API" card in search result. It will open Gmail api main page.
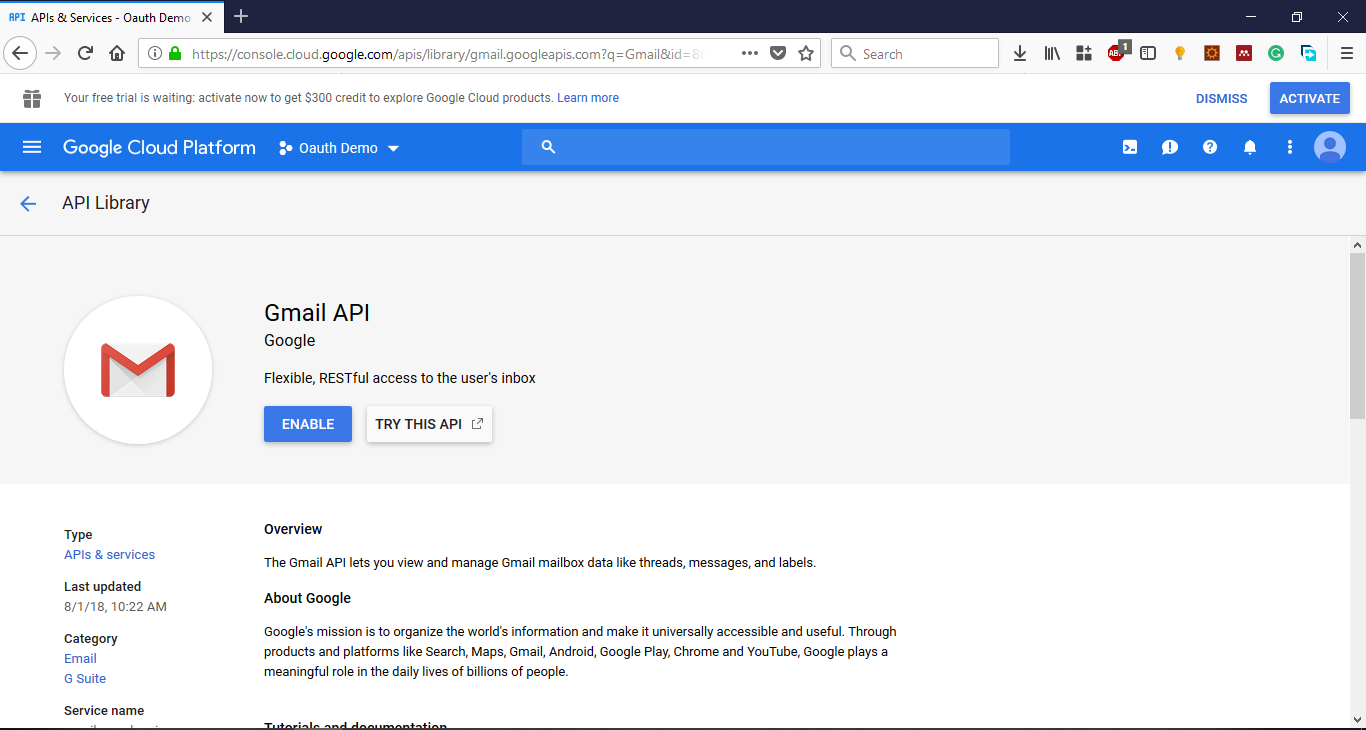
Click on "ENABLE" button to enable Gmail API within our project. Next you will redirected to Gmail API overview page.

As I mentioned earlier, we need api credentials in order to use Gmail API. So to create credentials, click "CREATE CREDENTIALS" button.

Fill above details as it is and click "What credentials do I need?" button.

Here you can give any name for your credential. As the redirect URL, fill the same URL as I filled. I will explain what is the usage of this redirect URL in the next section. For now, it is a REST endpoint within our web application. We don't need Javascript origins. So leave them blank. Then click "Create OAuth client ID" button.

Now you need to configure User Consent screen. user consent screen is the prompt that request user's confirmation to access to account using oauth. You may remember that in social network logins, they will ask access for some contents in your account. That is consent screen.
 |
| Facebook consent screen| Source: https://stackoverflow.com/questions/23415126/cannot-test-fb-login-to-post-without-submitting-app-for-review |
You can enter any name here. It will shown on the user concent screen. Then click "Continue" button.

Now you succesfully created your credentials. You can see your client id here. And also you can download your client_id and client_secret as a JSON file. Then click on "Done" button. Then go into credentials page. You would be able to see the credentials that you created now.
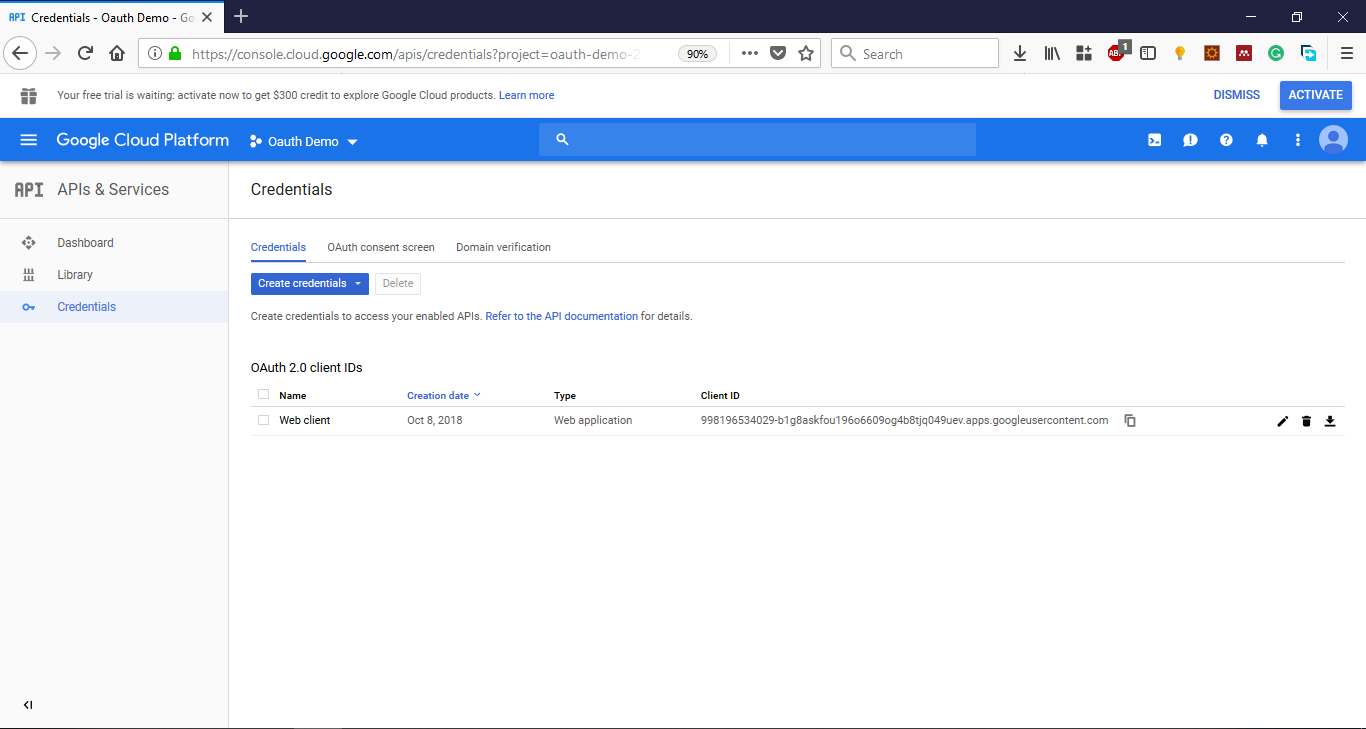
Now click on the credential we created now. In my case, "Web client". Then you will be able to see both client_id and client_secret.

We have succesfully obtained our client_id and client_secret!. Now its time to implement our web application and use these credentials.
We will going to develop this web application using Java, Spring Boot and Thymeleaf template engine. As the first step, we need to create a spring boot project. So lets create new project using spring initilizer.

You can give and name for group and artifact. And also you can use latest version at the time you read this. Keep others as it is. Make sure to add "Web" and "Thymeleaf" dependencies. Then click "Generate Project" button. It will download a zip file. Extract that file and open that project using an IDE. It will use IntelliJ IDEA.
We need more 2 external libraries to be added into project. Since our project is a maven project, we can add dependencies to our pom file. Open the pom.xml using IDE and add these two dependencies into dependencies section.
<dependency> <groupId>org.apache.httpcomponents</groupId> <artifactId>httpclient</artifactId> <version>4.5.6</version></dependency><dependency> <groupId>com.google.code.gson</groupId> <artifactId>gson</artifactId> <version>2.8.5</version></dependency>
It is better to make our application in a secure manner. So we can enable HTTPS support. So we can secure the connection between client and server. It is easy in spring boot. We need to create a secure self-signed certificate with .p12 format. We can create it using Java's keytool utility. Issue following command in command prompt (or terminal).
keytool -genkey -alias tomcat
 -storetype PKCS12 -keyalg RSA -keysize 2048
 -keystore keystore.p12 -validity 3650

Enter keystore password:
 Re-enter new password:
 What is your first and last name?
 [Unknown]:
 What is the name of your organizational unit?
 [Unknown]:
 What is the name of your organization?
 [Unknown]:
 What is the name of your City or Locality?
 [Unknown]:
 What is the name of your State or Province?
 [Unknown]:
 What is the two-letter country code for this unit?
 [Unknown]:
 Is CN=Unknown, OU=Unknown, O=Unknown, L=Unknown, ST=Unknown, C=Unknown correct?
 [no]: yes
It will create a file called keystore.p12. We need to copy and paste that file into resources folder in our project.
Then we need to change some configurations in the application.properties file. So open that file and add following properties into the file.
server.port=8443
server.ssl.enabled=true
server.ssl.key-store=classpath:keystore.p12
server.ssl.key-store-password=password
server.ssl.key-store-type=PKCS12
server.ssl.key-alias=tomcat
server.ssl.key-store-password is the password you entered while creating keyfile. We will use port 8443 as in convension since we are using HTTPS.
Now we are succesfully configured HTTPS in our server!. Lets start coding!
As the first step, we can create the controller class. So lets create a package called "controllers" and create a class called "MainController" within that package. Then add this code into the class.
import com.n256coding.oauthgmaildemo.helpers.WebRequestHelper;import com.n256coding.oauthgmaildemo.models.Message;import org.apache.catalina.servlet4preview.http.HttpServletRequest;import org.springframework.stereotype.Controller;import org.springframework.ui.Model;import org.springframework.web.bind.annotation.GetMapping;
import javax.servlet.http.HttpServletResponse;import java.io.IOException;import java.net.URISyntaxException;import java.security.KeyManagementException;import java.security.KeyStoreException;import java.security.NoSuchAlgorithmException;import java.util.List;
@Controllerpublic class MainController {


    @GetMapping("/callback")
    public String getCallback(HttpServletRequest request, HttpServletResponse response, Model model) throws KeyStoreException, NoSuchAlgorithmException, KeyManagementException, IOException, URISyntaxException {
        String requestCode = request.getParameter("code");
        String oAuthToken = WebRequestHelper.requestOAuthToken(requestCode);        List<String> mailIds = WebRequestHelper.requestMailIds(oAuthToken, 20);        List<Message> mailMessages = WebRequestHelper.getMailMessages(oAuthToken, mailIds);
        model.addAttribute("mails", mailMessages);

        return "works";    }


}
This method will run when Gmail server call redirection URL. So this is the redirection endpoint of our application.
To make Gmail related functions, I have created another class called "WebRequestHelper". So lets create a package called "helpers" and create "WebRequestHelper" class within that package. Then add following code into that class.
import com.google.gson.JsonArray;import com.google.gson.JsonElement;import com.google.gson.JsonObject;import com.google.gson.JsonParser;import com.n256coding.oauthgmaildemo.Environments;import com.n256coding.oauthgmaildemo.models.Message;import org.apache.http.HttpResponse;import org.apache.http.NameValuePair;import org.apache.http.client.HttpClient;import org.apache.http.client.entity.UrlEncodedFormEntity;import org.apache.http.client.methods.HttpGet;import org.apache.http.client.methods.HttpPost;import org.apache.http.impl.client.HttpClients;import org.apache.http.message.BasicNameValuePair;import org.apache.http.util.EntityUtils;
import java.io.IOException;import java.net.URI;import java.net.URISyntaxException;import java.security.KeyManagementException;import java.security.KeyStoreException;import java.security.NoSuchAlgorithmException;import java.util.ArrayList;import java.util.Iterator;import java.util.List;
public class WebRequestHelper {


    public static String requestOAuthToken(String requestCode) throws KeyStoreException, NoSuchAlgorithmException, KeyManagementException {
        HttpClient client = HttpClients.createDefault();
        HttpPost postRequest = new HttpPost("https://www.googleapis.com/oauth2/v4/token");        postRequest.setHeader("User-Agent", "Mozilla/5.0 (Windows NT 10.0; Win64; x64; rv:62.0) Gecko/20100101 Firefox/6");        postRequest.setHeader("Host", "www.googleapis.com");        postRequest.setHeader("Accept", "*/*");        postRequest.setHeader("Accept-Language", "en-US,en;q=0.5");        postRequest.setHeader("Accept-Encoding", "gzip, deflate, br");        postRequest.setHeader("Connection", "keep-alive");        postRequest.setHeader("Content-Type", "application/x-www-form-urlencoded");
        List<NameValuePair> urlParameters = new ArrayList<>();        try {
            urlParameters.add(new BasicNameValuePair("grant_type", "authorization_code"));            urlParameters.add(new BasicNameValuePair("redirect_uri", Environments.REDIRECT_URI));            urlParameters.add(new BasicNameValuePair("client_id", Environments.CLIENT_ID));            urlParameters.add(new BasicNameValuePair("code", requestCode));            urlParameters.add(new BasicNameValuePair("client_secret", Environments.CLIENT_SECRET));
            postRequest.setEntity(new UrlEncodedFormEntity(urlParameters));
        } catch (Exception e) {
            e.printStackTrace();        }

        JsonObject responseJson = null;        try {
            HttpResponse postResponse = client.execute(postRequest);            responseJson = new JsonParser()
                    .parse(EntityUtils.toString(postResponse.getEntity()))
                    .getAsJsonObject();        } catch (IOException e) {
            e.printStackTrace();        }

        return responseJson.get("access_token").getAsString();    }

    public static List<String> requestMailIds(String oAuthToken, int limit) throws KeyStoreException, NoSuchAlgorithmException, KeyManagementException, IOException {
        HttpClient client = HttpClients.createDefault();
        HttpGet getRequest = new HttpGet("https://www.googleapis.com/gmail/v1/users/me/messages?maxResults=" + limit);        getRequest.setHeader("User-Agent", "Mozilla/5.0 (Windows NT 10.0; Win64; x64; rv:62.0) Gecko/20100101 Firefox/6");        getRequest.setHeader("Host", "www.googleapis.com");        getRequest.setHeader("Authorization", "Bearer " + oAuthToken);
        HttpResponse response = client.execute(getRequest);        JsonObject mails = new JsonParser().parse(EntityUtils.toString(response.getEntity())).getAsJsonObject();        JsonArray messages = mails.getAsJsonArray("messages");
        List<String> messageIds = new ArrayList<>();        for (JsonElement message : messages) {
            messageIds.add(message.getAsJsonObject().get("id").getAsString());        }

        return messageIds;    }

    public static List<Message> getMailMessages(String oAuthToken, List<String> mailIds) throws KeyStoreException, NoSuchAlgorithmException, KeyManagementException, URISyntaxException, IOException {
        HttpClient client = HttpClients.createDefault();
        HttpGet getRequest = new HttpGet();        getRequest.setHeader("User-Agent", "Mozilla/5.0 (Windows NT 10.0; Win64; x64; rv:62.0) Gecko/20100101 Firefox/6");        getRequest.setHeader("Host", "www.googleapis.com");        getRequest.setHeader("Authorization", "Bearer " + oAuthToken);
        List<Message> messages = new ArrayList<>();        for (String mailId : mailIds) {
            getRequest.setURI(new URI("https://www.googleapis.com/gmail/v1/users/me/messages/" + mailId));            JsonObject mailObject = new JsonParser().parse(EntityUtils.toString(client.execute(getRequest).getEntity())).getAsJsonObject();            messages.add(extractMessageFrom(mailObject));        }

        return messages;    }

    private static Message extractMessageFrom(JsonObject jsonObject) {
        Message message = new Message();        message.setBody(jsonObject.get("snippet").getAsString());
        JsonArray headersJsonArray = jsonObject.get("payload")
                .getAsJsonObject()
                .get("headers")
                .getAsJsonArray();
        Iterator<JsonElement> headers = headersJsonArray.iterator();        while (headers.hasNext()) {
            JsonObject header = headers.next().getAsJsonObject();
            switch (header.get("name").getAsString()) {
                case "From":
                    message.setFrom(header.get("value").getAsString());                    break;                case "To":
                    message.setTo(header.get("value").getAsString());                    break;                case "Subject":
                    message.setSubject(header.get("value").getAsString());                    break;                case "Date":
                    message.setDate(header.get("value").getAsString());                    break;            }
        }
        return message;    }
}
"requestOAuthToken" method is used to get access_code from google servers. It will call google authentication server with code we taken from redirection endpoint. Since we are using authorization_code grant type, we need to recall authentication server to obtain oauth access_token. That process will happen here.
"requestMailIds" method is used to get list of ids that relavent to each email message. So that we can read each email by the id of that mail. Here we will calling Gmail API with access_code we obtained in previous method. In the request, we will send access_code in header as Bearer token.
"getMailMessages" method is used to read messages by ids. We have obtained list of ids in previous method. In this method, we will use those ids to read content of messages. As the previous method, we will send the same oauth access_token as a Bearer token.
"extractMessageFrom" method is used to create a POJO using a given json object.
App credentials are stored in different place. That is a best practice since keeping credentials in a different place will make code more clear and takes modifiability to higher level.
So create an Interface called Enviorements and add following code into that.
public interface Environments {
    String CLIENT_ID = "xxxxxxxxx";    String CLIENT_SECRET = "xxxxxxxxxxxxxxxx";    String REDIRECT_URI = "https://localhost:8443/callback";}
Here you should replace your client_id and client_secret with above dummy values.
Now we need to create the Message class which acts like as a Data Model. So lets create a package called "models" and create a class called "Message" within that package. Then add following code into the class.
public class Message {
    public String from;    public String to;    public String subject;    public String date;    public String body;
    public Message() {
    }

    public Message(String from, String to, String subject, String date, String body) {
        this.from = from;        this.to = to;        this.subject = subject;        this.date = date;        this.body = body;    }

    public String getFrom() {
        return from;    }

    public void setFrom(String from) {
        this.from = from;    }

    public String getTo() {
        return to;    }

    public void setTo(String to) {
        this.to = to;    }

    public String getSubject() {
        return subject;    }

    public void setSubject(String subject) {
        this.subject = subject;    }

    public String getDate() {
        return date;    }

    public void setDate(String date) {
        this.date = date;    }

    public String getBody() {
        return body;    }

    public void setBody(String body) {
        this.body = body;    }
}
Now we have successfully created the back-end of this application. Now its time to create front-end.
Lets create a HTML page called "index.html" in resources/templates folder. Then add following code into that file.
<!DOCTYPE html><html lang="en" xmlns:th="http://www.thymeleaf.org"><head>    <meta charset="utf-8">    <meta name="viewport" content="width=device-width, initial-scale=1, shrink-to-fit=no">
    <title>Home</title>    <link rel="stylesheet" href="https://maxcdn.bootstrapcdn.com/bootstrap/4.0.0/css/bootstrap.min.css" integrity="sha384-Gn5384xqQ1aoWXA+058RXPxPg6fy4IWvTNh0E263XmFcJlSAwiGgFAW/dAiS6JXm" crossorigin="anonymous">    <script src="scripts.js"></script></head><body>    <div class="container">        <div class="jumbotron jumbotron-fluid">            <div class="container">                <h1 class="display-4">Gmail Viewer</h1>                <p class="lead">Do you like to view your emails here?, Lets see!.</p>            </div>            <hr class="my-4">            <p class="lead">                <button id="showMails" class="btn btn-primary btn-lg" onclick="request()">View my Gmail messages</button>            </p>        </div>    </div>
</body></html>
This is the main page of this application. It contains a button which will call google authorization server to request user consent page. That process is done using a JavaScript. So I have created a JavaScript file called "scripts.js" to implement those functions.
So lets create a JavaScript file called "scripts.js" in resource/static folder. Then add following JavaScript code into that file.
var script = document.createElement('script');script.src = 'https://code.jquery.com/jquery-3.3.1.min.js';script.intgrity = 'sha256-FgpCb/KJQlLNfOu91ta32o/NMZxltwRo8QtmkMRdAu8=';script.crossorigin = 'anonymous';
document.getElementsByName('head')[0].appendChild(script);
$(document).ready(function () {
   $("#showMails").click(request);});
function request() {
    var AUTH_ENDPOINT = 'https://accounts.google.com/o/oauth2/v2/auth';    var CLIENT_ID = 'xxxxxxxxxxxxx';    var REDIRECT_URI = 'https://localhost:8443/callback';    var SCOPE = 'https://www.googleapis.com/auth/gmail.readonly';    var PROMPT = 'consent';    var RESPONSE_TYPE = 'code';
    var requestUrl = AUTH_ENDPOINT + '?'+
            'client_id='+CLIENT_ID+'&'+
            'redirect_uri='+encodeURIComponent(REDIRECT_URI)+'&'+
            'scope='+encodeURIComponent(SCOPE)+'&'+
            'prompt='+encodeURIComponent(PROMPT)+'&'+
            'access_type=offline&'+
            'response_type='+encodeURIComponent(RESPONSE_TYPE);
    window.location.href = requestUrl;}
Here I have imported JQuery in the top of script page. In the "request" function, You should replace your client_id with this dummy value.
Then we need to implement the web page to view emails. So lets create a HTML document called "works.html" in resources/templates folder and add following HTML code into the file.
<!DOCTYPE html><html lang="en" xmlns:th="http://www.thymeleaf.org"><head>    <meta charset="utf-8">    <meta name="viewport" content="width=device-width, initial-scale=1, shrink-to-fit=no">
    <title>It works</title>    <link rel="stylesheet" href="https://maxcdn.bootstrapcdn.com/bootstrap/4.0.0/css/bootstrap.min.css" integrity="sha384-Gn5384xqQ1aoWXA+058RXPxPg6fy4IWvTNh0E263XmFcJlSAwiGgFAW/dAiS6JXm" crossorigin="anonymous"></head><body>
    <div class="container">        <div class="jumbotron jumbotron-fluid">            <div class="container">                <h1 class="display-4">Mail Viewer</h1>                <p class="lead">We have collected latest 20 emails of your Gmail account, Take a look!.</p>            </div>        </div>        <div class="card" th:each="mail: ${mails}">            <h5 class="card-header" th:text="${mail.subject}">Featured</h5>            <div class="card-body">                <span>From: </span><p class="card-text" th:text="${mail.from}"></p>                <p class="card-text" th:text="${mail.date}"></p>                <h5 class="card-title" th:text="${mail.body}"></h5>            </div>        </div>    </div></body></html>
This is the web page to show email messages. Here I have used Thymeleaf template engine to load data into page. You can see there is loop like thing named "th:each". It will iterate each of email message and append seperate div sections for each mail message.
Finally, we have made the application succesfully!. Its time to run and test it. Lets start our spring boot application.
First we need to build the application using maven. So issue following command.
mvn clean package
Then run the application
java -jar target\oauth-gmail-demo\target\oauth-gmail-demo-0.0.1-SNAPSHOT.jar
Now server will start in port 8443
Open a web browser and enter this url
https://localhost:8443
Since we are using a self-signed certificate, browser will show a warning. You can allow the exception and make our application trusted. Then we can be able to see the main page of our application. Click on "View my Gmail messages" button. It will redirect you to google login page. If you have already logged into google account, you will see the user consent page. You can allow it. Then you can be able to see your latest 20 emails within your application page.
If the your application works as above mentioned way, all done. If it is not working as above, don't worry. It can be a small mistake. You can refer my fully working github project. And also you can ask me in comment section.
This is the end of this post. I hope this tutorial will help you to make a greate step into OAuth and Gmail API. Anyway, thank you for reading this.
Github Project - https://github.com/n256Coding/oauth-gmail-demo

can you provide the source code on how to send mail using springboot
ReplyDelete